1. 什么是Koa,Koa2
- Koa是Express的竞争品。Koa2是Koa的升级版本。
- Koa和Koa2与Express一样,都是基于Node.js开发的Web框架。
- 在koa中,一切的流程都是中间件,数据流向遵循洋葱模型,先入后出,是按照类似堆栈的方式组织和执行的,koa-compose是理解koa中间件的关键,在koa中间件中会深入分析。
- koa2与koa1的最大区别是koa2实现异步是通过async/awaite,koa1实现异步是通过generator/yield,而express实现异步是通过回调函数的方式。
- koa2与express 提供的API大致相同,express是大而全,内置了大多数的中间件,更让人省心,koa2不绑定任何的框架,干净简洁,小而精,更容易实现定制化,扩展性好。
- express是没有提供ctx来提供上下流服务,需要更多的手动处理,express本身是不支持洋葱模型的数据流入流出能力的,需要引入其他的插件。
以上内容参考:https://www.jianshu.com/p/a518c3d9c56d
2. Koa的安装和第一个Koa程序。
2.1 Koa安装
cmd进入工作目录,运行如下命令
cpmn install koa--save
2.2 第一个Koa程序
在工作目录新建app.js,并输入以下代码:
const koa = require("koa");
const app = new koa();

app.use(
    async (ctx) => {
        ctx.body="Hello Koa!"
    }
);

app.listen(3000);
在cmd中运行:
node app.js
浏览器中输入 localhost:3000 便可以访问使用koa建立的web服务器了。
3. Koa路由
3.1 Koa路由功能安装。
Koa的路由功能不是标配(这点和Express不同),需要在安装Koa的基础上安装路由模块Koa-router。
cmd切换到工作目录后使用以下命令安装:
cnpm install koa-router --save
3.2 第一个路由示例
const Koa = require("koa");
const Router = require("koa-router");

var app = new Koa();
var router = new Router();

//逐条指定方式
router.get("/",async(ctx)=>{ //ctx包含request和require等信息.
    ctx.body = "这里是首页";
});
router.get("/news",async(ctx)=>{
    ctx.body = "这里是新闻页面";
});

//连续简写方式
router.get("/list",async(ctx)=>{
    ctx.body = "这里是列表页面";
}).get("/details",async(ctx)=>{
    ctx.body = "这里是细节页面";
});

app.use(router.routes());//使用中间件:启动路由
app.use(router.allowedMethods());//使用中间件:设置响应头,比如页面出错的时候返回404

app.listen(3000,()=>{
    console.log("http://localhost:3000 is ready!");
});
3.3 动态路由
其实更好理解的方式就是通过路由(URL)传参。
const Koa = require("koa");
const Router = require("koa-router");

var app = new Koa();
var router = new Router();

router.get("/product/:name/:brand/:price",(ctx)=>{
    console.log(ctx.params);
    ctx.body="产品页面!";
});

app.use(router.routes());
app.use(router.allowedMethods());

app.listen(3000,()=>{
    console.log("http://localhost:3000 is ready!");
});
访问 http://localhost:3000/page?name=Tom&gender=male ,cmd中结果如下:

4. Koa中间件
中间件的概念类似于其它语言中的过滤器。
Koa中间件的运行流程采用的洋葱模式。
const Koa = require("koa");
const Router = require("koa-router");

var app = new Koa();
var router = new Router();

//应用级中间件,app.use("可选路由",函数)
//如果指定路由,则只对目标路由有效,如果不指定,则对所有路由有效.
app.use(async (ctx,next)=>{
    ctx.body="This is the middleware";
    await next();//如果没有next()指令,则其它的代码不会再执行.
});
router.get("/",async(ctx)=>{
    ctx.body += "This is the index page!";//所以呢,为了后期使用中间件更方便,即便初次指定ctx.body,也建议使用+=这种赋值方法.
});

app.use(router.routes());
app.use(router.allowedMethods());

app.listen(3000,()=>{
    console.log("http://localhost:3000 is ready!");
});
5. ejs模板引擎的使用
5.1 安装koa-views和ejs
cnpm install koa-views --save
cnpm install ejs --save
5.2 第一个ejs示例
本示例共有三个文件。
第1个文件:/根目录/koa-views.js,代码如下:
const Koa = require("koa");
const Router = require("koa-router");
const Views = require("koa-views");

var app = new Koa();
var router = new Router();

app.use(Views("./views",{ //   ./views 指明模板文件夹位置
    //extension:"ejs"    //方案一:识别.ejs文件.
    map:{html:'ejs'}   //方案二:将.html视为.ejs文件,可以在html文件中撰写ejs代码.
}));

app.use(async(ctx,next)=>{   //配置公共变量信息
    ctx.state.userinfo = "Tom";
    await next();
});

router.get("/fejs",async(ctx)=>{
    let title = "hello EJS";
    let arr = ["111","222","333"];
    await ctx.render("firstEJS",{ //await必须加
        title:title,
        list:arr
    });
});

app.use(router.routes());
app.use(router.allowedMethods());

app.listen(3000,()=>{
    console.log("http://localhost:3000 is ready!");
});
第2个文件:/根目录/views/firstEJS.html,代码如下:
<!DOCTYPE html>
<html>
    <head>
        <meta charset="utf-8">
        <title></title>
    </head>
    <body>
        <%- include('header.html') -%> <!--注意:最新版本的EJS需要用这种语法引入文件-->
        <h2><%=title%></h2>
        这里是EJS文件
        <ul>
            <%for(var i=0;i<list.length;i++){%>
                <li><%=list[i]%></li>
            <%}%>
        </ul>
        <%=userinfo%>
    </body>
</html>
第3个文件:/根目录/views/header.html,代码如下:
<h1>这里是头部内容!</h1>
命令行运行:
node koa-view.js
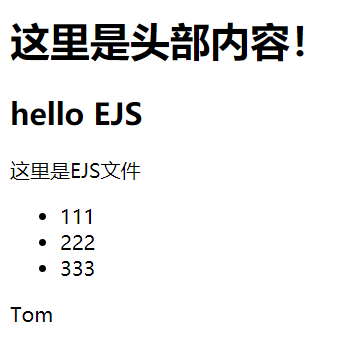
浏览器中打开 http://localhost:3000 显示结果如下:
6. 获取get和post数据。
6.1 获取get数据
通过ctx.query
const Koa = require("koa");
const Router = require("koa-router");

var app = new Koa();
var router = new Router();

router.get("/page",async(ctx)=>{
    console.log(ctx.query);
    console.log(ctx.querystring);
    ctx.body = "hello page!";
});

app.use(router.routes());
app.use(router.allowedMethods());

app.listen(3000,()=>{
    console.log("http://localhost:3000 is ready!");
});
访问 http://localhost:3000/page?name=Tom&gender=male ,cmd中结果如下:

6.2 获取post数据。
6.2.1 安装koa-bodyparser
cnpm install koa-bodyparser --save
6.2.2 获取post数据示例
本示例有两个文件:
第1个文件:/根目录/postdata.js
const Koa = require("koa");
const Router = require("koa-router");
const Views = require("koa-views");
var bodyParser = require("koa-bodyparser");

var app = new Koa();
var router = new Router();

app.use(Views("./views",{ //   ./views 指明模板文件夹位置
    //extension:"ejs"    //方案一:识别.ejs文件.
    map:{html:'ejs'}   //方案二:将.html视为.ejs文件,可以在html文件中撰写ejs代码.
}));

router.get("/",async(ctx,next)=>{
    await ctx.render("index");
});

app.use(bodyParser());
//获取post数据
router.post("/doAdd",async(ctx)=>{
    ctx.body = ctx.request.body;
});

app.use(router.routes());
app.use(router.allowedMethods());

app.listen(3000,()=>{
    console.log("http://localhost:3000 is ready!");
});
第2个文件:/根目录/views/index.html
<!DOCTYPE html>
<html>
    <head>
        <meta charset="utf-8">
        <title></title>
    </head>
    <body>
        <form action="/doAdd" method="post">
            <input type="text" name="username" />
            <input type="password" name="password"/>
            <input type="submit" value="提交"/>
        </form>
    </body>
</html>
在浏览器中访问 http://localhost:3000 随意填写数据后提交,结果如下:

7. koa-static静态资源中间件
7.1 安装koa-static
cnpm install koa-static --save
7.2 第一个koa-static示例
与express的static非常相似。
本示例有三个示例文件。
文件1:/根目录/view/index.html
<!DOCTYPE html>
<html>
    <head>
        <meta charset="utf-8">
        <title></title>
        <link rel="stylesheet" type="text/css" href="./css/style.css"/>
    </head>
    <body>
        你好!
    </body>
</html>
文件2:/根目录/static/css/style.css
body{
    font-size:50px;
}
文件3:/根目录/index.js
const Koa = require("koa");
const Router = require("koa-router");
const Views = require("koa-views");
const Static = require("koa-static");

var app = new Koa();
var router = new Router();

app.use(Views("./views",{ //   ./views 指明模板文件夹位置
    //extension:"ejs"    //方案一:识别.ejs文件.
    map:{html:'ejs'}   //方案二:将.html视为.ejs文件,可以在html文件中撰写ejs代码.
}));

router.get("/",async(ctx,next)=>{
    await ctx.render("index");
});

app.use(Static("static"));

app.use(router.routes());
app.use(router.allowedMethods());

app.listen(3000,()=>{
    console.log("http://localhost:3000 is ready!");
});
8. art-template模板引擎的使用
art-template是ejs的竞争品,用法和ejs非常类似。只不过速度比ejs要快。
8.1 art-template安装
cnpm install art-template --save
cnpm install koa-art-template --save
8.2 art-tempalte示例
本示例有三个文件:
文件1:/根目录/art_template.js
const Koa = require("koa");
const Router = require("koa-router");
const render = require("koa-art-template");

var app = new Koa();
var router = new Router();

render(app,{
    root:"views",//目录
    extname:".html",//文件名后缀,可以任意指定
    debug:process.env.NODE_ENV !== "production"//是否开启调试模式
});

router.get("/",async(ctx)=>{
    let list = {
        name:"Tom"
    };
    await ctx.render("index",{
        list:list
    });
});

app.use(router.routes());
app.use(router.allowedMethods());

app.listen(3000,()=>{
    console.log("http://localhost:3000 is ready!");
});
文件2:/根目录/views/index.html
<!DOCTYPE html>
<html>
    <head>
        <meta charset="utf-8">
        <title></title>
    </head>
    <body>
        {{include "./header.html"}}
        <br/>
        <% include("./header.html") %>
        <br/>
        你好!
        <br/>
        {{list.name}}           <!--两种模板语法都可以-->
        <br/>
        <%=list.name%>            <!--两种模板语法都可以-->
    </body>
</html>
文件2:/根目录/views/header.html
<h1>这里是头部内容!</h1>